Search Our Content Library
- Accredited Learning
- Adobe
- AI in AECO+D&M
- Arch-Intelligence
- Autodesk
- Autodesk Construction Cloud
- AVAIL
- Bentley
- Bluebeam
- Business & Management Skills
- Camtasia
- Enscape
- Esri
- EVOLVE MEP
- Global BIM Standards
- Green Badger
- Guardian
- Health & Safety (HSI)
- Ideate Software
- Lumion
- Manufacturing Design
- MarkedUp
- McNeel
- Microsoft
- Newforma
- Newforma Konekt
- OneClick LCA
- Panzura
- Pinnacle Series
- Procore
- Project Management
- Revizto
- SketchUp
- SmartDraft
- Solibri
- SOLIDWORKS
- Tekla
- Trimble
- Twinmotion
- US Army Corps of Engineers
- V-Ray
- Course Library
- /
- Civil 3D 2024
- /
- Railway Design in Civil 3D
Learning Path Courses:
-
Basic Rail Design - Part 1
Basic Rail Design - Part 1: Course Introduction In Basic Rail Design - Part 1, you will learn how to complete a basic rail design in Civil 3D. The rail design workflow is similar to roadway design, only different design criteria and specifications are used. Rail designs utilize spirals to create smooth transitions in and out of curves, and, like roadways, employ cant (superelevation) to raise and lower rail elevations, thereby counteracting centrifugal forces. Civil 3D includes unique settings and design criteria for rail design that include measuring curves along chord lengths, rail alignment types, and rail assembly types. Civil 3D also features a Rail tab where you can access commonly used Rail tools. Course Objectives The material presented in this course teaches you: Layout and edit a rail alignment Calculate and apply Cant to a rail alignment Layout and edit a rail profile Create a rail assembly Create and edit a rail corridor Report earthwork quantities Report material quantities Course Prerequisites To participate in this training course, you should have a basic understanding of the following: Civil 3D Fundamentals Course Duration: 154 Minutes Tips: Turn off your phone, and close your email, text, and social media apps. Plug headphones or earbuds to your computer. Go Full Screen when watching videos. -
Basic Rail Design - Part 2
Basic Rail Design - Part 2: Course Introduction In Basic Rail Design - Part 2, you will learn additional tools and methods essential to railway design. Like most infrastructure projects, railway projects are often unique and have distinct design requirements and challenges. This is often the case when designing the rail alignment and profile to retrofit an existing condition. In this course, we'll look at various alternatives, best practices, and tips for railway design. The videos in this course can be accessed in any order. They are not part of a comprehensive or sequential curriculum, but rather a flexible collection of standalone tips, tools, and insights intended to supplement the foundational rail design workflow covered in Part 1. Feel free to explore the topics most relevant to your needs, and leverage the exercise dataset to practice using the tools covered in this course. Course Objectives The material presented in this course will teach you how to: Lay out a rail alignment using tangents and preconfigured curve settings. Lay out a best-fit alignment. Lay out a rail alignment using Horizontal Regression analysis. Lay out a best-fit profile. Edit a stock rail assembly to meet your project needs. Display, validate, and report corridor models. Use corridor targets and transitions. Report rail quantities using Sample Lines. Course Prerequisites To participate in this training course, you should have a basic understanding of the following: Civil 3D Fundamentals Basic Rail Design - Part 1 Course Duration: 154 Minutes Tips: Turn off your phone, and close your email, text, and social media apps. Plug headphones or earbuds to your computer. Go Full Screen when watching videos. -
Multi-Track Rail Design
Multi-Track Rail Design: Course Introduction This Civil 3D training course provides a comprehensive workflow for multi-track rail design, from initial alignment setup to advanced corridor modeling and detailing. You’ll learn how to create offset alignments, profiles, turnouts, and crossovers, then build and refine multi-track assemblies and corridor regions using dynamic relationships for accuracy and flexibility. The course also covers advanced tasks such as adding platforms, skeleton tracks, and rail lines, as well as troubleshooting and optimizing corridor surfaces for construction-ready models. Course Objectives The material presented in this course teaches you how to: Create offset alignments and profiles Create crossovers and turnouts Work with diverted alignments and profiles Build-out multi-track rail assemblies Model advanced rail corridors Use skeleton tracks in rail corridors Add platforms to a rail design Create and edit rail lines Course Prerequisites To participate in this training course, you should have a basic understanding of the following: Basic understanding of Autodesk Civil 3D Completed Basic Rail Design Part 1 & 2 Course Duration: 180 Minutes Tips: Turn off your phone, and close your email, text, and social media apps. Plug headphones or earbuds to your computer. Go Full Screen when watching videos. -
Multi-Track Rail Design
Multi-Track Rail Design: Course IntroductionThis Civil 3D training course provides a comprehensive workflow for multi-track rail design, from initial alignment setup to advanced corridor modeling and detailing. You’ll learn how to create offset alignments, profiles, turnouts, and crossovers, then build and refine multi-track assemblies and corridor regions using dynamic relationships for accuracy and flexibility. The course also covers advanced tasks such as adding platforms, skeleton tracks, and rail lines, as well as troubleshooting and optimizing corridor surfaces for construction-ready models.
Course Objectives
The material presented in this course teaches you how to:
- Create offset alignments and profiles
- Create crossovers and turnouts
- Work with diverted alignments and profiles
- Build-out multi-track rail assemblies
- Model advanced rail corridors
- Use skeleton tracks in rail corridors
- Add platforms to a rail design
- Create and edit rail lines
Course Prerequisites
To participate in this training course, you should have a basic understanding of the following:
Basic understanding of Autodesk Civil 3D
Completed Basic Rail Design Part 1 & 2
Video Duration: 90 Minutes
Tips:
Turn off your phone, and close your email, text, and social media apps.
Plug headphones or earbuds to your computer.
Go Full Screen when watching videos.
-
Basic Rail Design - Part 1
Basic Rail Design - Part 1: Course IntroductionIn Basic Rail Design - Part 1, you will learn how to complete a basic rail design in Civil 3D. The rail design workflow is similar to roadway design, only different design criteria and specifications are used. Rail designs
utilize spirals to create smooth transitions in and out of curves, and, like roadways, employ cant (superelevation) to raise and lower rail elevations, thereby counteracting centrifugal forces. Civil 3D includes unique settings and design criteria for rail design that include measuring curves along chord lengths, rail alignment types, and rail assembly types. Civil 3D also features a Rail tab where you can access commonly used Rail tools.
Course Objectives
The material presented in this course teaches you:
- Layout and edit a rail alignment
- Calculate and apply Cant to a rail alignment
- Layout and edit a rail profile
- Create a rail assembly
- Create and edit a rail corridor
- Report earthwork quantities
- Report material quantities
Course Prerequisites
To participate in this training course, you should have a basic understanding of the following:
Civil 3D Fundamentals
Approximate Duration: 68 Minutes (Video duration)
Tips:
Turn off your phone, and close your email, text, and social media apps.
Plug headphones or earbuds to your computer.
Go Full Screen when watching videos.
-
Basic Rail Design - Part 2
Basic Rail Design - Part 2: Course IntroductionIn Basic Rail Design - Part 2, you will learn additional tools and methods essential to railway design. Like most infrastructure projects, railway projects are often unique and have distinct design requirements and challenges. This is often the case when designing the rail alignment and profile to retrofit an existing condition. In this course, we'll look at various alternatives, best practices, and tips for railway design.
The videos in this course can be accessed in any order. They are not part of a comprehensive or sequential curriculum, but rather a flexible collection of standalone tips, tools, and insights intended to supplement the foundational rail design workflow covered in Part 1. Feel free to explore the topics most relevant to your needs, and leverage the exercise dataset to practice using the tools covered in this course.
Course Objectives
The material presented in this course will teach you how to:
- Lay out a rail alignment using tangents and preconfigured curve settings.
Lay out a best-fit alignment.
Lay out a rail alignment using Horizontal Regression analysis.
Lay out a best-fit profile.
Edit a stock rail assembly to meet your project needs.
Display, validate, and report corridor models.
Use corridor targets and transitions.
Report rail quantities using Sample Lines.
Course Prerequisites
To participate in this training course, you should have a basic understanding of the following:
Civil 3D Fundamentals
Basic Rail Design - Part 1
Approximate Duration: 77 Minutes (Video duration)
Tips:
Turn off your phone, and close your email, text, and social media apps.
Plug headphones or earbuds to your computer.
Go Full Screen when watching videos.
-
Basic Rail Design
Basic Rail Design Course Introduction
(Course Duration: 52 minutes)
Course Description
In this course, you will learn how to complete a basic rail design in Civil 3D. The rail design workflow is similar to roadway design only different design criteria and specifications are used. Rail designs typically use spirals to create smooth transitions in and out of curves, and apply cant (superelevation) to rails and ballast to counteract centrifugal forces. Civil 3D includes unique settings and design criteria for rail design that include measuring curves along chord lengths, rail alignment types, and rail assembly types. Civil 3D also includes a Rail tab where you can access commonly used Rail tools.
Course Objectives
The material presented in this course teach you how to:
· Layout a Rail Alignment
· Calculate Cant for a Rail Alignment
· Layout a Rail Profile using Design Checks
· Create a Rail Assembly
· Create a Rail Corridor
· Report Earthwork Quantities for a Rail Design
· Report Material Quantities for a Rail Design
Course Prerequisites
To participate in this training course, you should have the following:
· Fundamentals skills in Civil 3D
Tips:
· Turn off your phone, close your email, text and social media apps.
· Plug headphones or ear buds to your computer.
· Go Full Screen when watching videos.
-
Auxiliary Track Design
Auxiliary Track Design Course Introduction
(Course Duration: 42 minutes)
Course Description
In this course you will learn how to layout and model rail spurs using crossover and turnout alignments from the Rail tools in Civil 3D. In Civil 3D you can leverage the Turnout catalogs that ship with the software or create custom turnouts for your rail designs. Using the Double Track rail subassembly that ships with the software you can accurately model the rail corridor at the track connection points. The rail spur example presented in this course will prepare you for more challenging and complex rail designs.
Course Objectives
The material presented in this course teach you how to:
· Create a crossover alignment between parallel tracks
· Create a turnout alignment between two rail alignments
· Create design profiles from superimposed profiles
· Use the Double Track rail subassembly to target multiple alignments and profiles
· Add multiple rail spur regions to a mainline corridor
· View and edit a rail corridor
Course Prerequisites
To participate in this training course, you should have the following:
· Basic understanding of Autodesk Civil 3D.
· Completed the Basic Rail Design course.
Tips:
· Turn off your phone, close your email, text and social media apps.
· Plug headphones or ear buds to your computer.
· Go Full Screen when watching videos.
-
Basic Rail Design
Basic Rail Design Course Introduction (Course Duration: 52 minutes) Course Description In this course, you will learn how to complete a basic rail design in Civil 3D. The rail design workflow is similar to roadway design only different design criteria and specifications are used. Rail designs typically use spirals to create smooth transitions in and out of curves, and apply cant (superelevation) to rails and ballast to counteract centrifugal forces. Civil 3D includes unique settings and design criteria for rail design that include measuring curves along chord lengths, rail alignment types, and rail assembly types. Civil 3D also includes a Rail tab where you can access commonly used Rail tools. Course Objectives The material presented in this course teach you how to: Layout a Rail Alignment Calculate Cant for a Rail Alignment Layout a Rail Profile using Design Checks Create a Rail Assembly Create a Rail Corridor Report Earthwork Quantities for a Rail Design Report Material Quantities for a Rail Design Course Prerequisites To participate in this training course, you should have the following: Fundamentals skills in Civil 3D CPD via CPD UK Accredited Course This course is eligible for Continuing Professional Development (CPD) credit via CPD UK. This is a globally recognized CPD meaning the learning activity has reached the required Continuing Professional Development standards and benchmarks. If you would like to learn more, please see CPDUK. You can log your CPD credits by creating an account and providing the correct, required information. If you would like to log your CPD credits with another organization, you will need to navigate that process as directed by the target organization. SAICE - ECSA Accredited Course This course is eligible for SAICE - ECSA Engineering Council of South Africa continuing professional development credits. If you would like to receive these credits, please fill out this form in its entirety. Make sure all required fields- including your name, email address, and course feedback- are completed accurately. Once your submission is received and verified, your personalized certificate will be emailed to the address you provided. Tips: Turn off your phone, close your email, text and social media apps. Plug headphones or ear buds to your computer. Go Full Screen when watching videos. -
Auxiliary Track Design
Auxiliary Track Design Course Introduction (Course Duration: 42 minutes) Course Description In this course you will learn how to layout and model rail spurs using crossover and turnout alignments from the Rail tools in Civil 3D. In Civil 3D you can leverage the Turnout catalogs that ship with the software or create custom turnouts for your rail designs. Using the Double Track rail subassembly that ships with the software you can accurately model the rail corridor at the track connection points. The rail spur example presented in this course will prepare you for more challenging and complex rail designs. Course Objectives The material presented in this course teach you how to: Create a crossover alignment between parallel tracks Create a turnout alignment between two rail alignments Create design profiles from superimposed profiles Use the Double Track rail subassembly to target multiple alignments and profiles Add multiple rail spur regions to a mainline corridor View and edit a rail corridor Course Prerequisites To participate in this training course, you should have the following: Basic understanding of Autodesk Civil 3D. Completed the Basic Rail Design course. CPD via CPD UK Accredited Course This course is eligible for Continuing Professional Development (CPD) credit via CPD UK. This is a globally recognized CPD meaning the learning activity has reached the required Continuing Professional Development standards and benchmarks. If you would like to learn more, please see CPDUK. You can log your CPD credits by creating an account and providing the correct, required information. If you would like to log your CPD credits with another organization, you will need to navigate that process as directed by the target organization. SAICE - ECSA Accredited Course This course is eligible for SAICE - ECSA Engineering Council of South Africa continuing professional development credits. If you would like to receive these credits, please fill out this form in its entirety. Make sure all required fields- including your name, email address, and course feedback- are completed accurately. Once your submission is received and verified, your personalized certificate will be emailed to the address you provided. Tips: Turn off your phone, close your email, text and social media apps. Plug headphones or ear buds to your computer. Go Full Screen when watching videos.
Like what you see? We’d love to give you a guided tour of the best Pinnacle has to offer.
Book Your DemoTrusted By Leaders









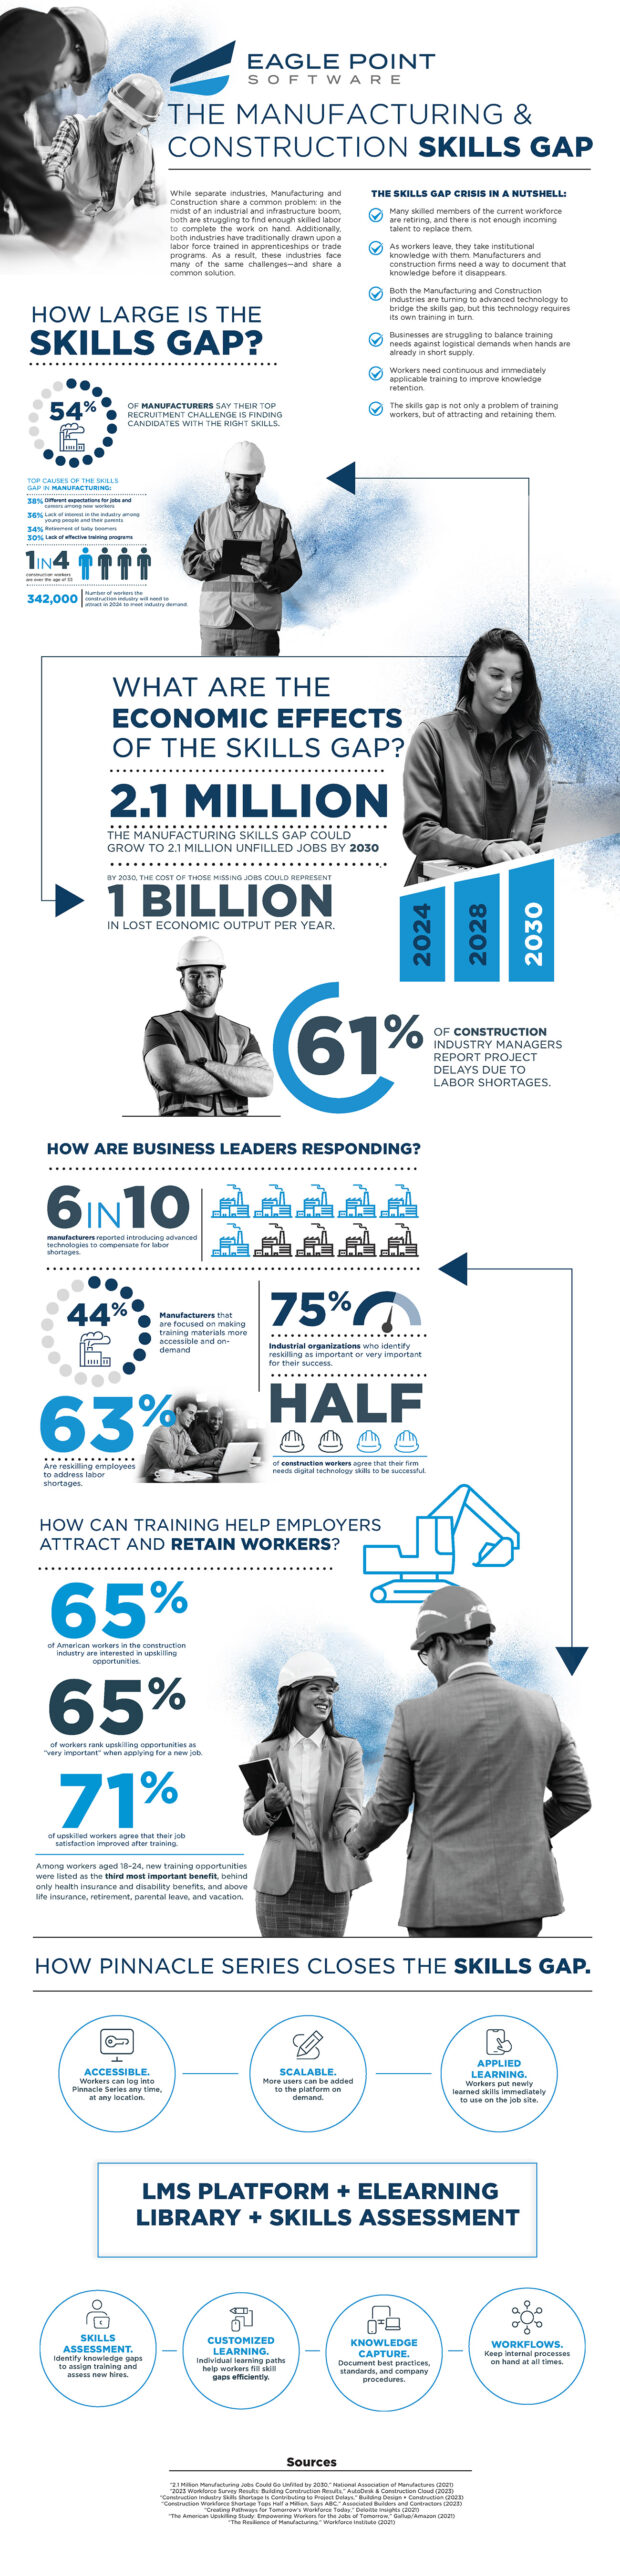
Understanding the Manufacturing & Construction Skills Gap
We went deep into the latest market research and created a resource to give you fresh insight into your recruitment challenges.